Installing Hash Studios Admin Ban Menu
Version: This guide is for Unity 2022.3.6f1. The steps may be different in future versions of Unity.
Introducing Hash Studios Admin Ban Menu—a powerful Udon Unity prefab designed for community hosts and club owners to effectively manage players in their VR world. With an array of robust features, this menu ensures smooth and secure player interactions.
Hash Studios Admin Ban Menu grants admins the ability to interact with players based on their role (player, admin, or yourself), with customizable colors for each role: Admins (dark blue), selected players (light cyan), banned players (red), and normal players (grey). Tailor these settings to fit your unique needs.
This comprehensive menu offers various functionalities such as:
- View player avatars and rank status
- Access a player's point of view
- Teleport to players or bring players to your location
- Only admins can see and use this menu, ensuring secure management
- Banish disruptive players to a designated area, ensuring they remain isolated from the main area
- Easily unban players to return them to the normal respawn location
- Manage player movements by mobilizing or immobilizing them
- Automatically grant admin rights to instance masters if toggled
- Disable admin abilities towards one another to prevent conflicts
Enhance your VR world's management capabilities with Hash Studios Ban Menu—your ultimate solution for efficient and secure player administration.
Features
- Role-based player management
- Customizable colors for roles
- Viewing player avatars and ranks
- Teleportation options for players
- Ban and unban players with ease
- Mobilize or immobilize players
- Easy installation process
VR Showcase World
Experience Hash Studios Ban Menu for yourself here: VRChat Showcase World
Requirements
You can learn how to set up your project beforehand at our project setup guide.
How to Use
Hash Studios Admin Ban Menu allows you to interact with players based on their roles. Only admins have access to this menu, ensuring secure management.
- Viewing Player Information
- Click on a player to view their avatar and rank status (admin, player, banned, etc.). Avatars of different sizes are supported, though some may not display perfectly (e.g., animal avatars).
- Viewing a Player's Point of View (POV)
- Click "View POV" to see from a selected player's perspective.
- Teleportation Options
- Teleport To: Click "Teleport To" to move to a player's location, useful for getting their attention.
- Teleport Here: Click "Teleport Here" to bring the selected player to your location.
- Banning and Unbanning Players
- Ban Player: Press "Ban Player" to send the player to a specified part of the map. They will be teleported to the ban location and removed from the main area. If they try to respawn, they will be sent back to the ban location.
- Unban Player: Press "Unban Player" to return a banned player to the normal respawn location. Unbanned or non-banned players will respawn at the normal respawn area.
- Managing Player Movements
- Mobilize: Press "Mobilize" to allow the player to move.
- Immobilize: Press "Immobilize" to prevent the player from moving, useful for managing situations without distractions.
Installation Steps
1. Download and Import the Prefab
- Download Hash Studios Admin Ban Menu from our website.
- Import the prefab into your Unity project:
- In Unity, go to
Assets>Import Package>Custom Package... - Locate and select the downloaded prefab package.
- Click
Importto add the prefab to your project.
- In Unity, go to
2. Add the Prefab to Your World
- Drag Hash Studios Admin Ban Menu into your world from the Project window.
- Right-click on the prefab in the Hierarchy window and select
Prefab > Unpack Prefab.
3. Configure Hash Studios Admin Ban Menu


- Select Hash Studios Admin Ban Menu in your Hierarchy.
- In the Inspector window, you will see the configuration options for Hash Studios Admin Ban Menu.
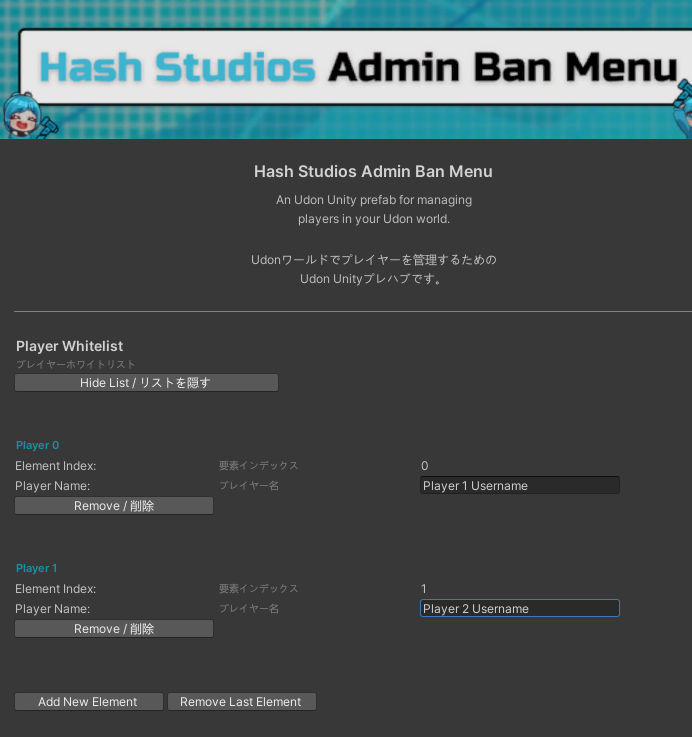
4. Edit Player Whitelist
The Player Whitelist section allows you to specify which players are admins. Only players added to this list will have access to the admin menu and its management features.
- In the
Player Whitelistsection, add the usernames of the players you want to grant admin rights to.
5. Edit General Settings
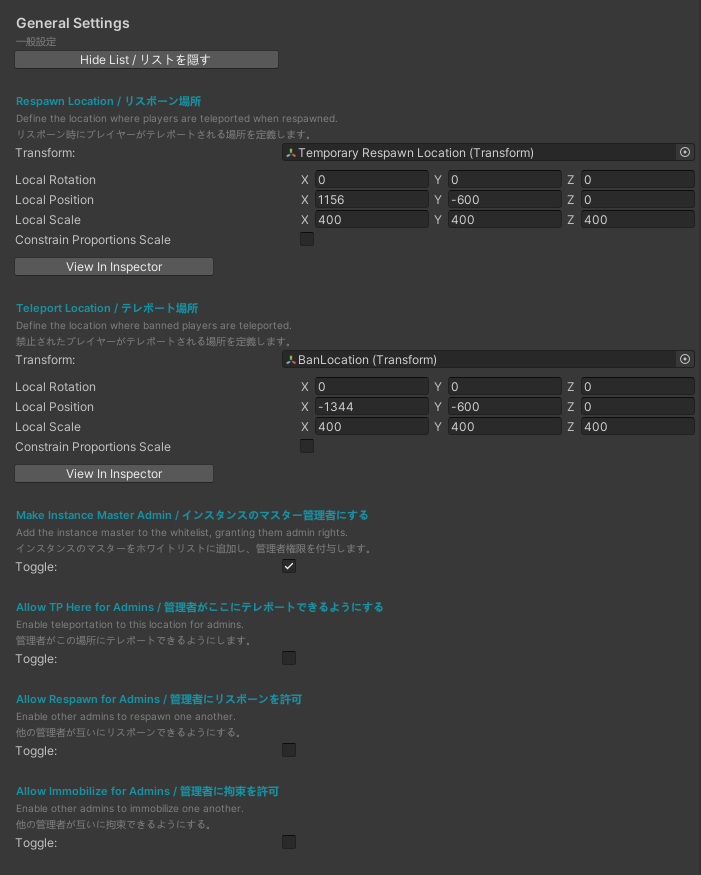
The General Settings section contains options to configure the basic functionality and behavior of the admin menu.
-
Respawn Location, where players are teleported when respawned.warningIf this is not your spawn location in your world, the prefab will not function properly.
-
Teleport Location, where banned players are teleported.warningMake sure it is in an actual room and not an area that would crash the user or go against VRChat's terms.
-
Make Instance Master Admin: This toggle adds the instance master to the whitelist, granting them admin rights when the world starts.- Default: on
-
Allow TP Here for Admins: This toggle enables teleportation between admins for other admins.- Default: off
-
Allow Respawn for Admins: This toggle allows other admins to respawn one another if needed.- Default: off
-
Allow Immobilization for Admins: This toggle allows admins to immobilize one another if needed.- Default: off
6. Edit Color Customization
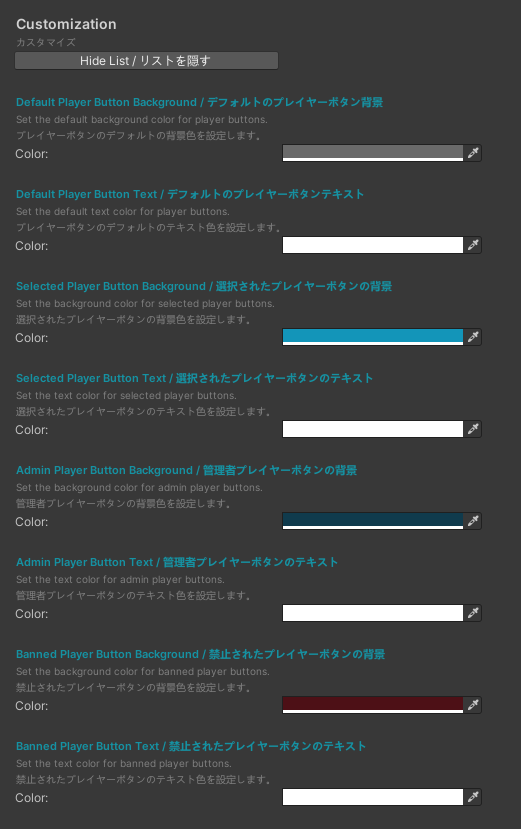
- Customize the colors for each role. There are four color sets available for three roles: admin, banned player, normal player, as well as a color for selected players.
Default Player Button Background:- Default: grey
Default Player Button Text:- Default: white
Selected Player Button Background:- Default: light cyan
Selected Player Button Text:- Default: black
Admin Player Button Background:- Default: dark blue
Admin Player Button Text:- Default: white
Banned Player Button Background:- Default: red
Banned Player Button Text:- Default: white
By following these steps, you can successfully install Hash Studios Admin Ban Menu and enhance the management of your VR world with secure and efficient player administration.
For more detailed information and resources, visit the Official Website or watch the YouTube Tutorial.